Garrattfan's Modelrailroading Pages
SBB Ae 3/6
Assembly
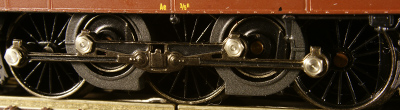
The first step of the re-assembly of the loco could be undertaken while the painting was going on. The bare loco drive was test run in the presence of the new owner's father and we found it to run only at higher voltages. Slow running performance was poor. I expect this loco to have been sitting around in storage for a long, long time before the owner abandoned it. Moreover the wheels show little sign of use so I expect it has seen little service if any at all, maybe spending its life in a display cabinet. Well, anyway, a good reason to do a good running in job.

Cradled upside down the loco can be wired to run in
I set the speed to about half and let it run in both directions for half an hour. I could hear the sound pitching up slowly which was an indication that running in could very well be a good remedy. Than I turned the speed up to 3/4 of the scale and let it run for another half hour in both directions. After that slow running performance was retested and proved satisfying.
A video of running in (but why bother it is just as interesting as watching paint dry):
At the start of the re-assembly I laid out all parts to familiarize myself again. After all it has been some six weeks since I disassembled the locomotive. In the background a photo I took before disassembly to help me track the various parts. |
|
 |
Windows simply click in, just remember to keep the curved corners on top and the depiction of the window bars on the inside. |
 |
Next I inserted the grab iron at the doors. Long end on the top, short end on the bottom through the steps under the cab door.
|
 |
Doing the grab irons first was a WRONG choice! When I tried to slide in the window glazing the grab irons not only proved to be in the way but also showed that they were intended to fit through the corresponding holes in the glazing. |
 |
See? |
 |
I bent the top end of the grab irons back to almost 90 degrees and pushed them out, re-inserted the glazing, pushed the grab irons into place and then bent them around the glazing. I dared not remove the grab irons altogether, as bending the short ends at the steps again might cause them to break. |
 |
Inserting the drivers' control table was easy, it simply clicks into place in the glazing.
I considered installing a driver and painting the control table. Well, no driver because installing one would see him driving backwards in 50% of the cases and installing two drivers would be nonsense. The control table remained unpainted because it has so little detail that I did want to highlight that fact. Moreover, the glazing of the cab is so thick that seeing the control table at all is a challenge anyway. |
 |
The lamps were pushed into place... |
 |
...and the light conduits replaced |
 |
|
 |
The side weights slid in. I secured them with a few dots of simple every day hobby glue. |
 |
Some parts are really, really tiny. |
 |
The whistle back into place |
 |
A monumental moment: the number plates go back on.
I glued them with a tiny bit of two component epoxy allowing the glue to set for half an hour before continuing.
|
 |
After installation of the front number plates the hand grips were installed. As they slid all too easily in and out of their respective holes I added a little household glue to secure them in place. |
 |
Final parts to install were both pantographs. |
 |
Before inserting the screw of the pantograph don't forget to scrape away some paint to restore the current conducting function of the brass strip in the underside of the roof. |
 |
That's it. It's done! |
 |
Finally the body is screwed to the drive and we have a .... |


Sign my
GuestBook